- Business solutions
- Cloud and IT solutions
- Cloud services
- Frequently Asked Questions
Frequently asked questions related to the work with #VivaCloud
- 1. CONFIGURATION OF THE WORKSTATION TO PROVIDE THE POSSIBILITY OF DOWNLOADING THE INSTALLATION SOFTWARE OR VIRTUAL SERVERS TEMPLATES OF #VivaCloud ORGANIZATION TO ITS CATALOGS
- 2. IP ADDRESSES ALLOCATED FOR #VivaCloud ORGANIZATION ON THE INTERNET
- 3. FIREWALL RULES CONFIGURATION OF THE VIRTUAL ROUTER OF #VivaCloud ORGANIZATION (BLOCKS NETWORK TRAFFIC BY DEFAULT)
- 4. CONFIGURATION OF THE ACCESSIBILITY OF VIRTUAL SERVERS OF #VivaCloud ORGANIZATION TO THE INTERNET (SNAT RULES). CONFIGURATION OF THE ACCESSIBILITY TO VIRTUAL SERVERS OF #VivaCloud ORGANIZATION FROM THE INTERNET (DNAT RULES).
- 5. CONFIGURATION OF SSL VPN-PLUS (ACCESS TO THE SERVERS LOCATED AT #VivaCloud FROM WORKSTATIONS)
- 6. ASSIGNMENT OF THE EXTERNAL IP ADDRESS ON THE VIRTUAL SERVER OF #VivaCloud ORGANIZATION
- 7. CONFIGURATION OF IPSEC VPN (ACCESS TO THE SERVERS LOCATED AT #VivaCloud FROM THE LOCAL NETWORK OF THE CUSTOMER)
1. Configuration of workstation to provide the possibility of downloading the installation software or virtual servers templates of #VivaCloud organization to its catalogs
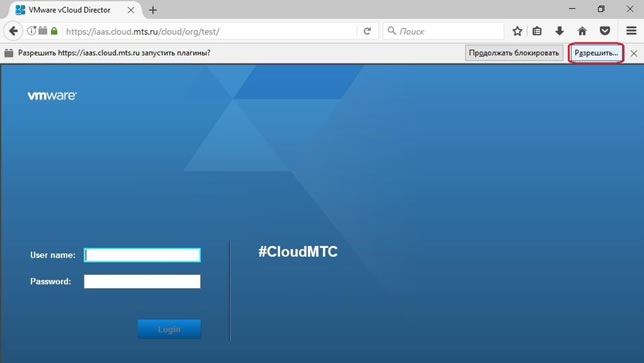
For ensuring the possibility of downloading the installation software or virtual servers templates of #VivaCloud organization to its catalogs it is necessary to:
a) Download and install Mozilla Firefox (32bit) ESR 52.0 (https://iaas.disk.mts.ru/public-link/6894edc900ca16dc).
b) Disable the automatic update of the browser (click on the icon in the upper right corner of the browser window -> “Settings” -> “Advanced” -> “Never check for updates”).
c) Download and install the current version of “Adobe Flash Player” for “Mozilla Firefox” (open in Firefox https://get.adobe.com/ru/flashplayer/).
d) Download and install the “Client Integration Plug-In” (Windows (other browsers)): .https://kb.vmware.com/kb/2145401
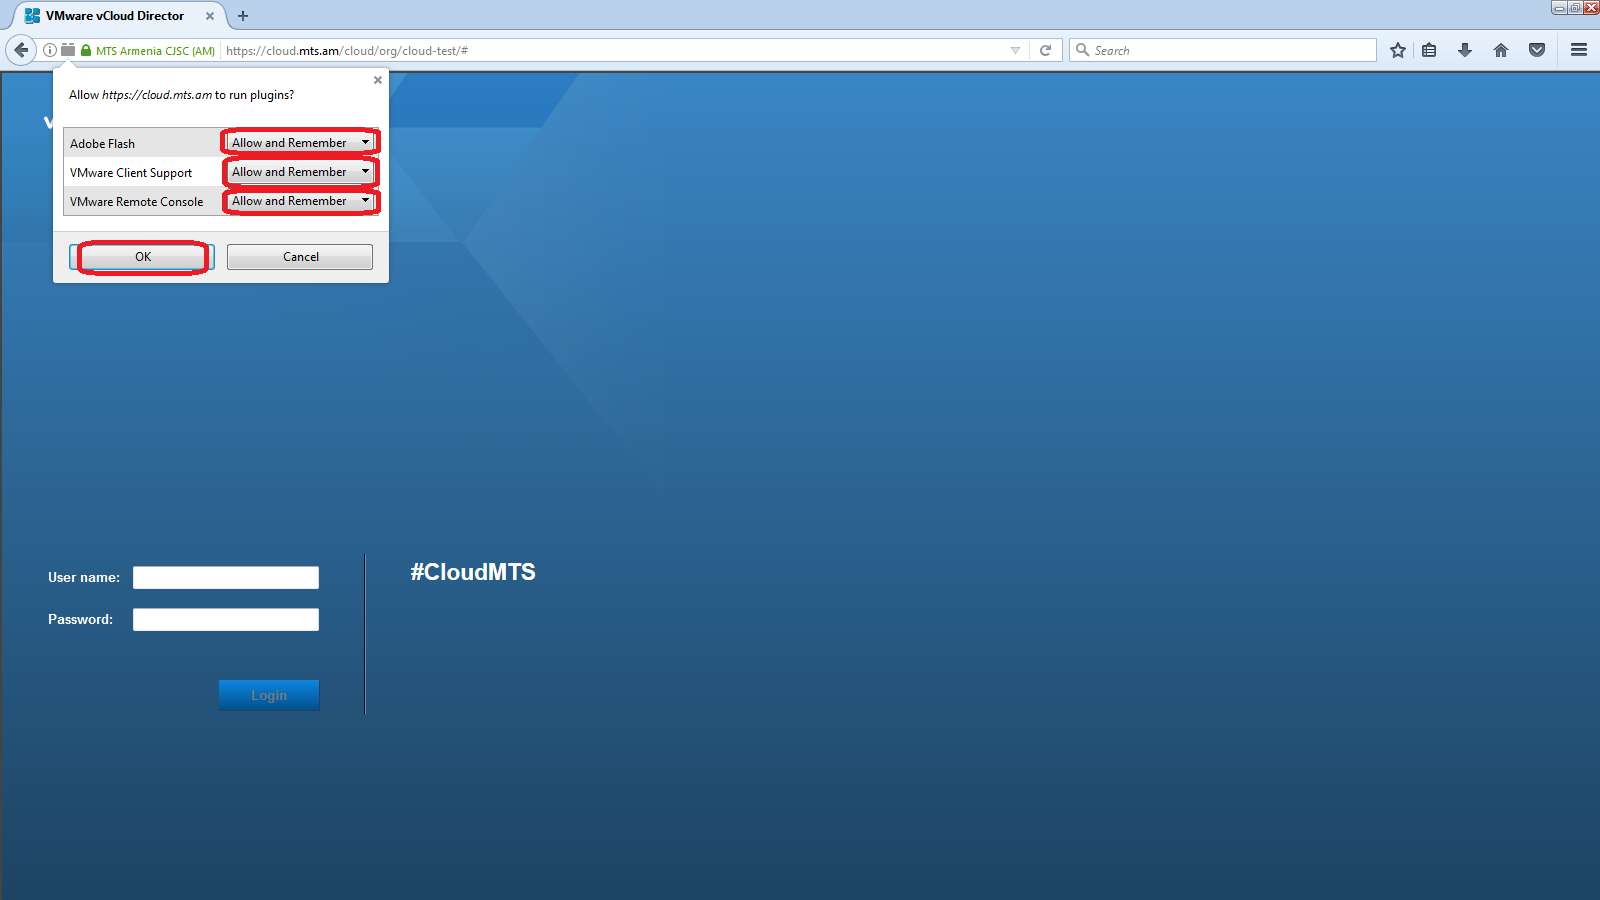
e) When logging into the system of #VivaCloud server resources administration, select the following rights for plug-ins:
2. IP addresses allocated for #VivaCloud organization on the Internet
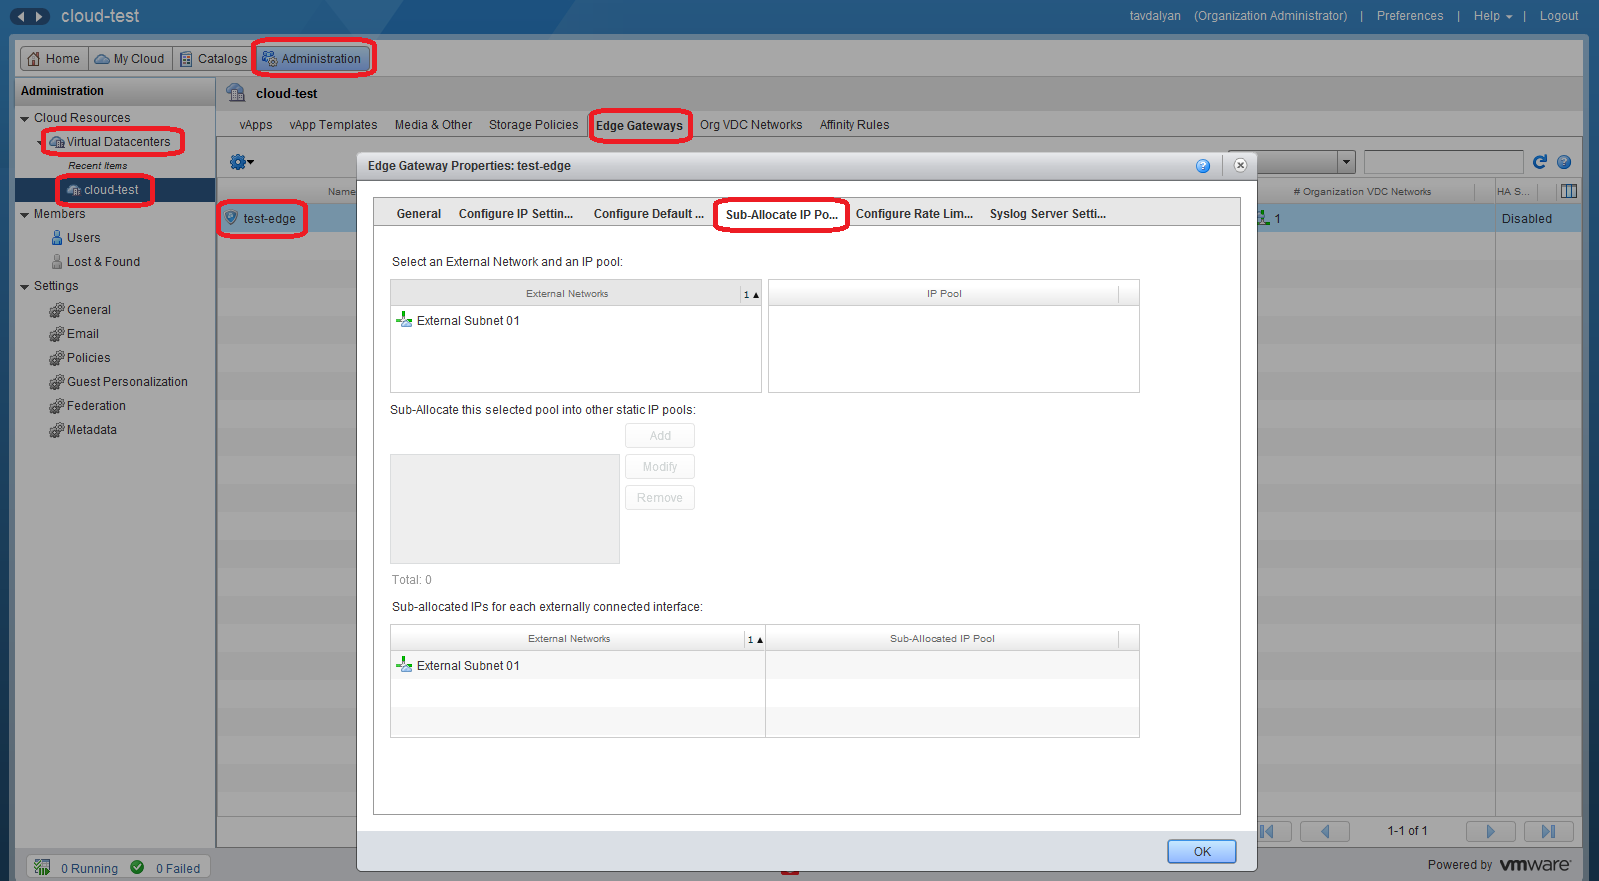
In order to find out which IP addresses on the Internet are allocated for your #VivaCloud organization, select the “Administration” section in the top panel, then select “Virtual Datacenter” of your #VivaCloud organization (Test-VDC), select the “Edge Gateways” section of the appeared panel set, right-click on the virtual router of your #VivaCloud organization (Test-EdgeGW) and select the “Properties ...” item in the drop-down menu. The information about the IP addresses allocated for your #VivaCloud organization on the Internet is presented on the “Sub-Allocate IP Pools” tab.
3. Firewall rules configuration of the virtual router of #VivaCloud organization (blocks network traffic by default)
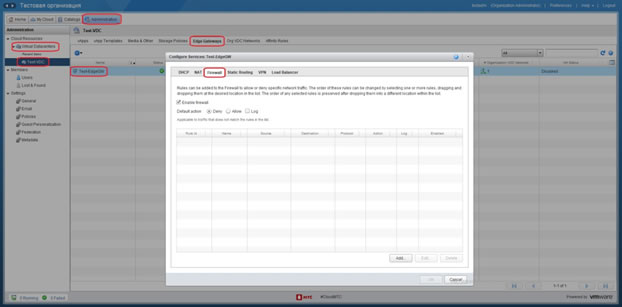
In order to configure the Firewall of the virtual router of #VivaCloud organization, it is necessary to select the “Administration” section in the top panel, then select “Virtual Datacenter” of your #VivaCloud organization (Test-VDC), select the “Edge Gateways” section of the appeared panel set, right-click on the virtual router of your #VivaCloud organization (Test-EdgeGW), select the “Edge Gateway Services...” section in the drop-down menu and open the “Firewall” tab.
Note: The “Firewall” service is required for the Internet access of virtual servers (SNAT rules) or for access to the servers from the Internet (DNAT rules). Therefore, it should not be disabled completely (do not remove the checkmark "Enable firewall"). To “enable the Firewall”, select the “Allow” option of the “Default action”.
4. Configuration of the accessibility of virtual servers of #VivaCloud organization to the Internet (SNAT rules). Configuration of the accessibility to virtual servers of #VivaCloud organization from the Internet (DNAT rules).
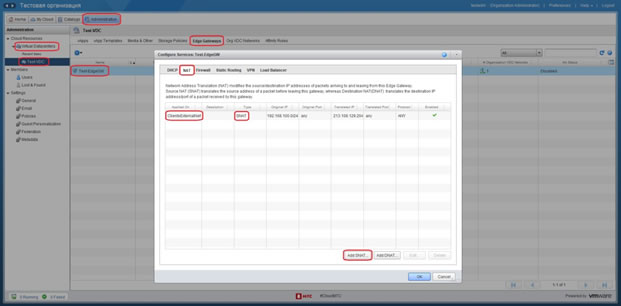
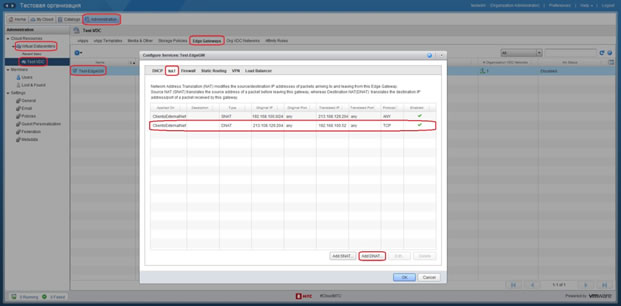
To provide Internet access to the virtual servers of #VivaCloud organization, it is necessary to create the corresponding SNAT rules for the “ClientExternalNetwork*” and to provide access to the servers from the Internet, create DNAT rules. To do this, select the “Administration” section in the top panel, then select “Virtual Datacenter” of your #VivaCloud organization (Test-VDC), select the “Edge Gateways” section on the new panel set, right-click on the virtual router of your #VivaCloud organization (Test-EdgeGW), select the “Edge Gateway Services...” in the drop-down menu and open the “NAT” tab.
5. Configuration of SSL VPN-Plus (access to the servers located at#VivaCloud from workstations)
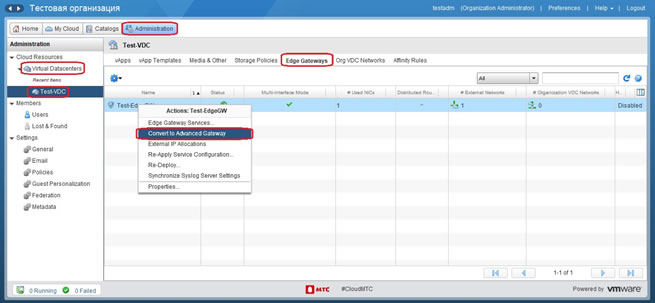
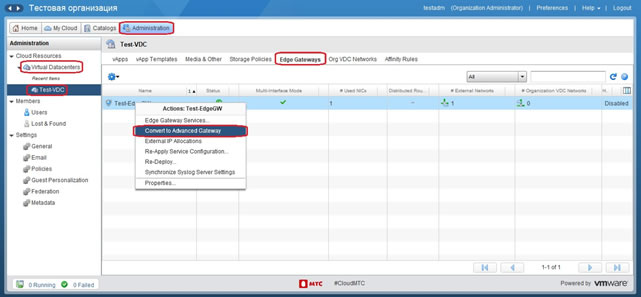
To configure from the workstation the accessibility to the servers located at #VivaCloud, it is necessary to: a) Convert the virtual router of #VivaCloud organization into “Advanced Gateway”. To do this, select the “Administration” section in the top panel, then select the “Virtual Datacenter” of your #VivaCloud organization (Test-VDC), select the “Edge Gateways” section in the panel set that is displayed, right-click on the virtual router of your #VivaCloud organization (Test-EdgeGW) and select the “Convert to Advanced Gateway” item in the drop-down menu. Select "Yes” in the appeared window.
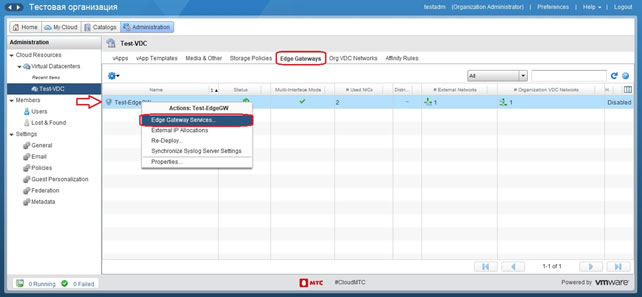
b) Right click on the virtual router icon of your organization and select the “Edge Gateway Services ...” item.
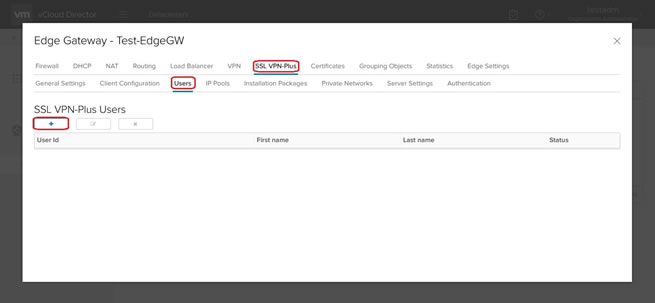
c) In the appeared window, select the “SSL VPN-Plus” section, then select the “Users” subsection and click the “+” button.
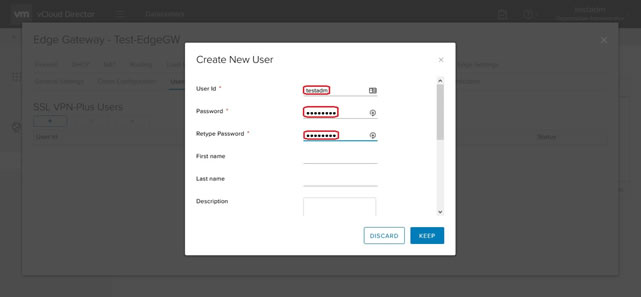
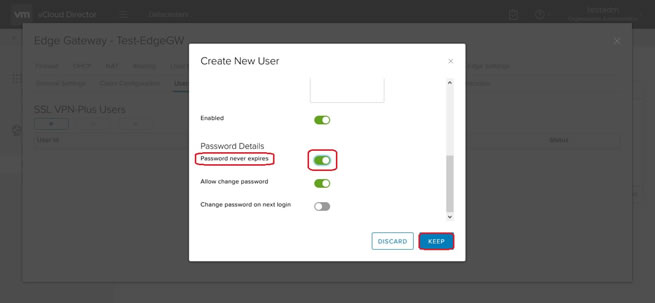
d) In the appeared window, enter the user name in the “User Id” item, enter the user password in the “Password” and “Retype Password” items, enable the “Password never expires” option and click the “KEEP” button to apply the settings.
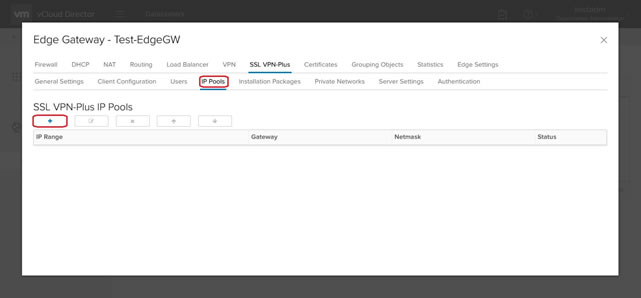
e) Select the "IP Pools" subsection and click the "+" button. In the appeared window, enter the IP addresses range for the VPN transit subnetwork in the “IP Range” (the subnetwork should not coincide with the networks in #VivaCloud organization), enter the subnetwork mask in the “Netmask”, enter subnetwork gateway in the “Gateway”, enable the “Status” option and click the “KEEP” button to apply the settings.
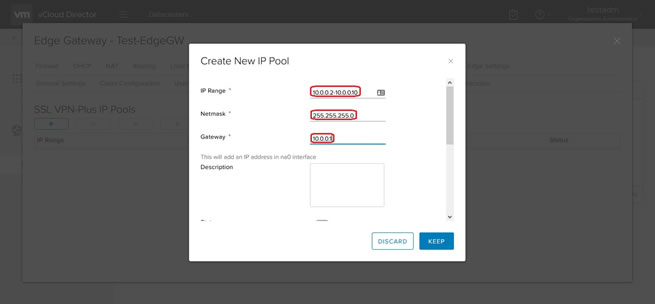
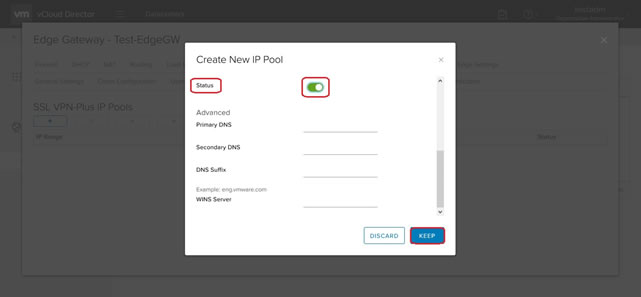
f) Select the "Installation Packages" subsection and click the "+" button. In the appeared window, enter the name of the installation package in the “Profile Name” item, enter the external IP address of the virtual router of #VivaCloud organization in the “Gateway” column, if necessary, select the “Linux” and “Mac” options to install the VPN client on OS data, select the “Allow remember password” and “Create desktop icon” options, and click the “KEEP” button to apply the settings.
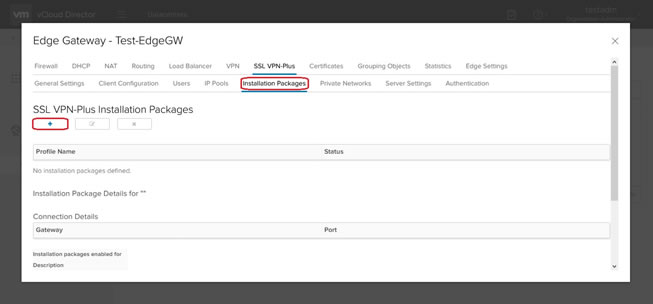
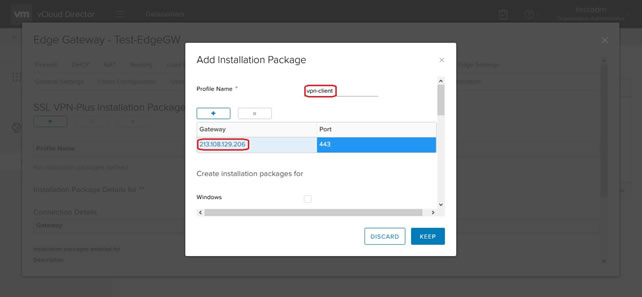
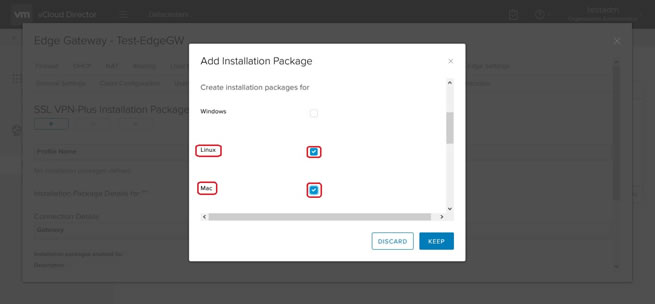
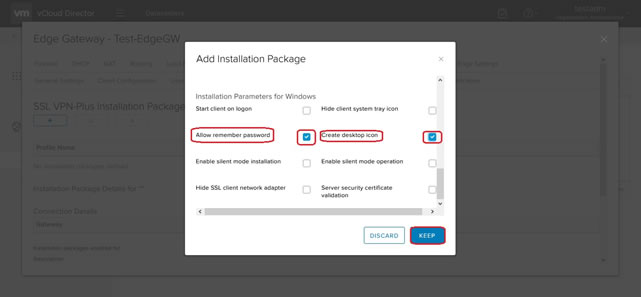
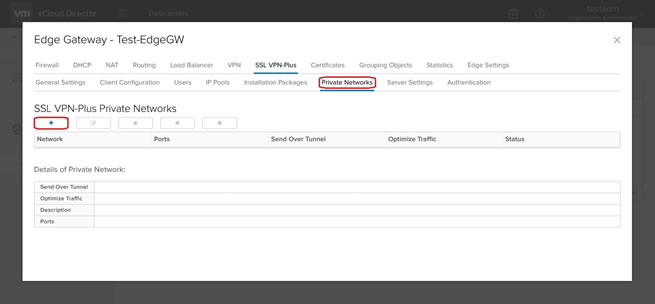
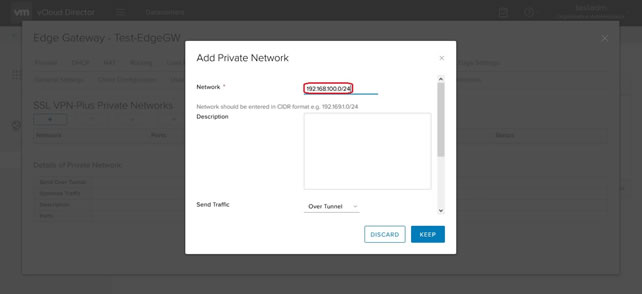
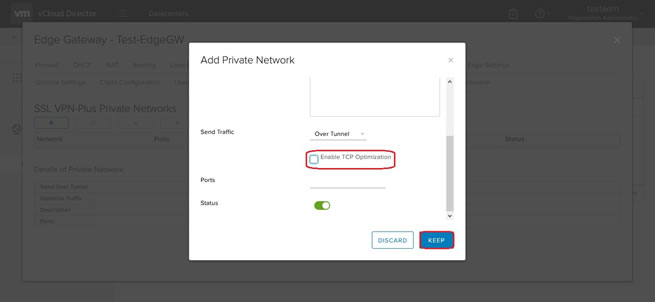
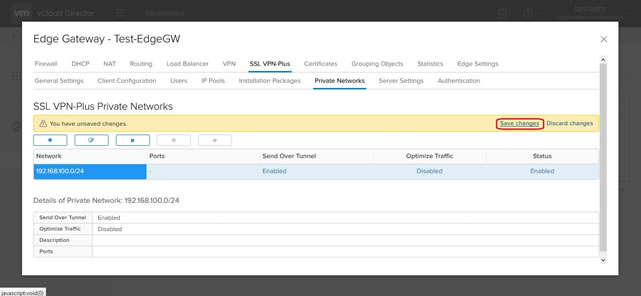
g) Select the “Private Networks” subsection and click the “+” button. In the appeared window, in the “Network” item, enter the network address of #VivaCloud organization, access to which is required, disable the “Enable TCP Optimization” option, click the “KEEP” button and then “Save Changes” to apply the settings.
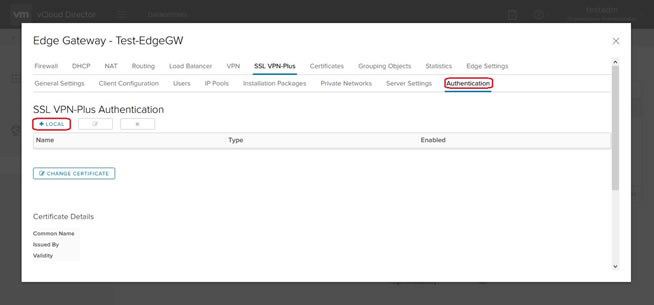
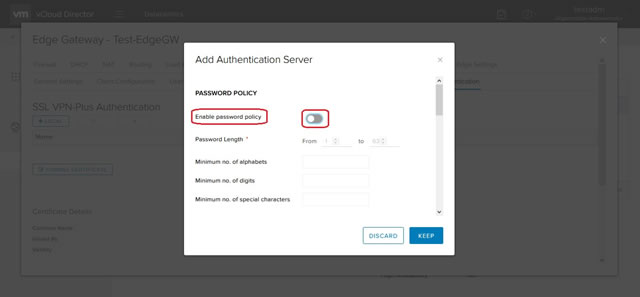
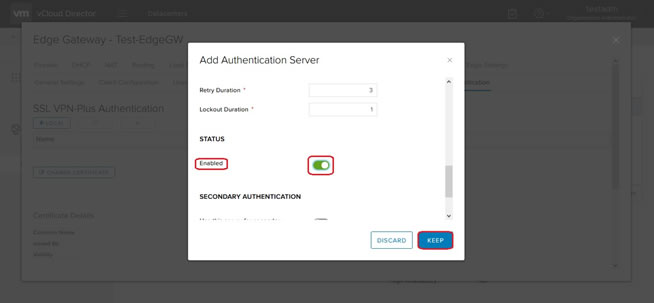
h) Select the “Authentication” subsection and click the “+ LOCAL” button. In the appeared window, disable the “Enable Password Policy” option, enable the “Enabled” option and click the “KEEP” button to apply the settings.
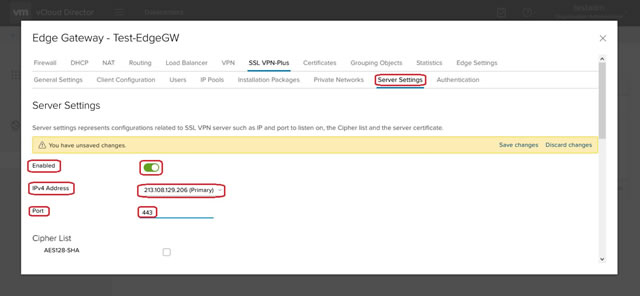
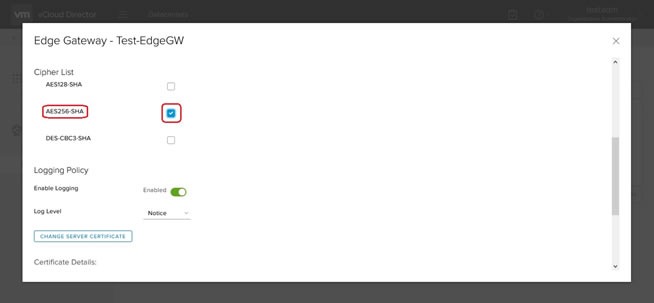
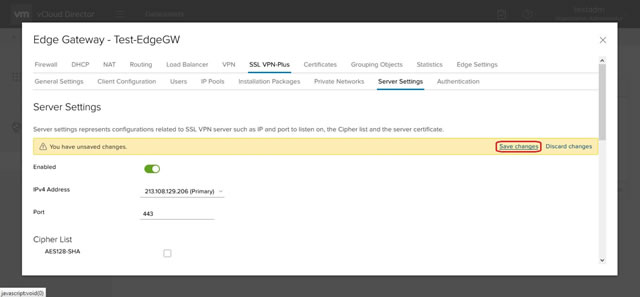
i) Select the “Server Settings” subsection, enable the “Enabled” option, in the “IPv4 Address”, select the external IP address of the server in the drop-down menu, select the server port in the “Port” item, select the “AES256-SHA” option and click the “Save Changes” button to apply the settings.
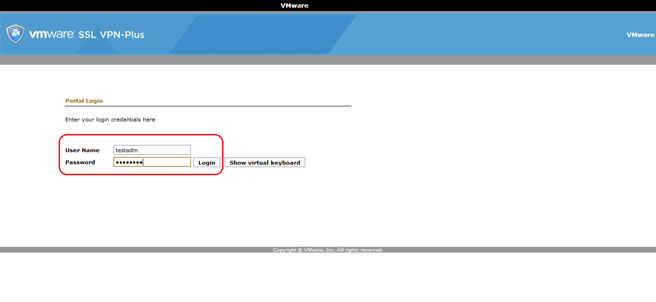
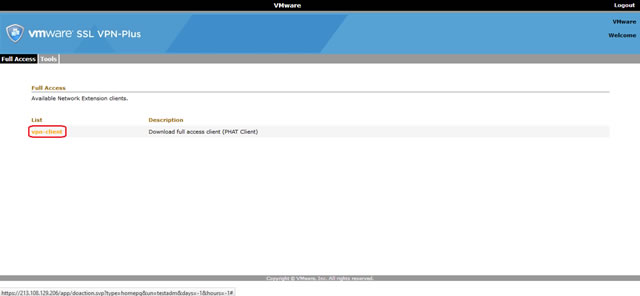
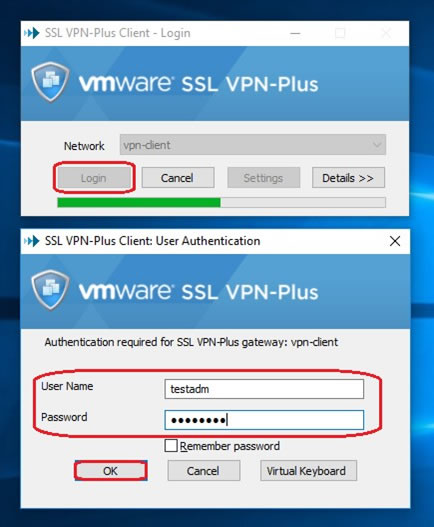
j) Download and install the VPN client at the address specified in clause “f” of the instruction (https://213.108.129.206:443) using the access details specified in clause “d” of the instruction. After installing the VPN client, start it and enter the details specified in clause “d” of the instruction to set the connection.
6. Assignment of the external IP address on the virtual server of #VivaCloud organization
To assign an external IP address to the network adapter of the virtual server of #VivaCloud organization, it is necessary to:
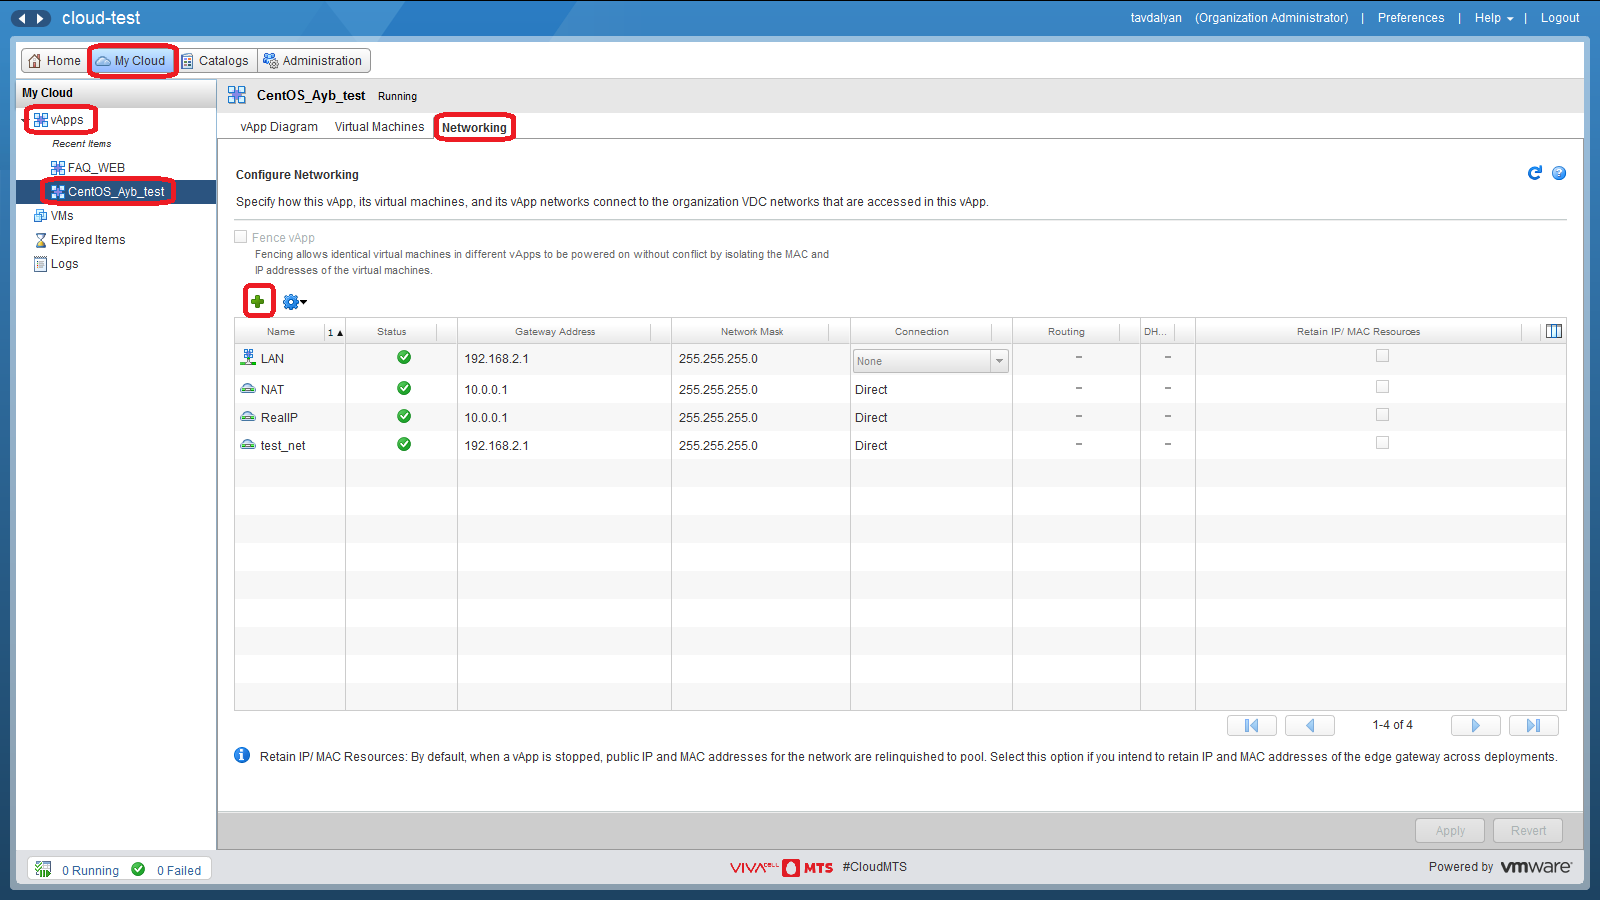
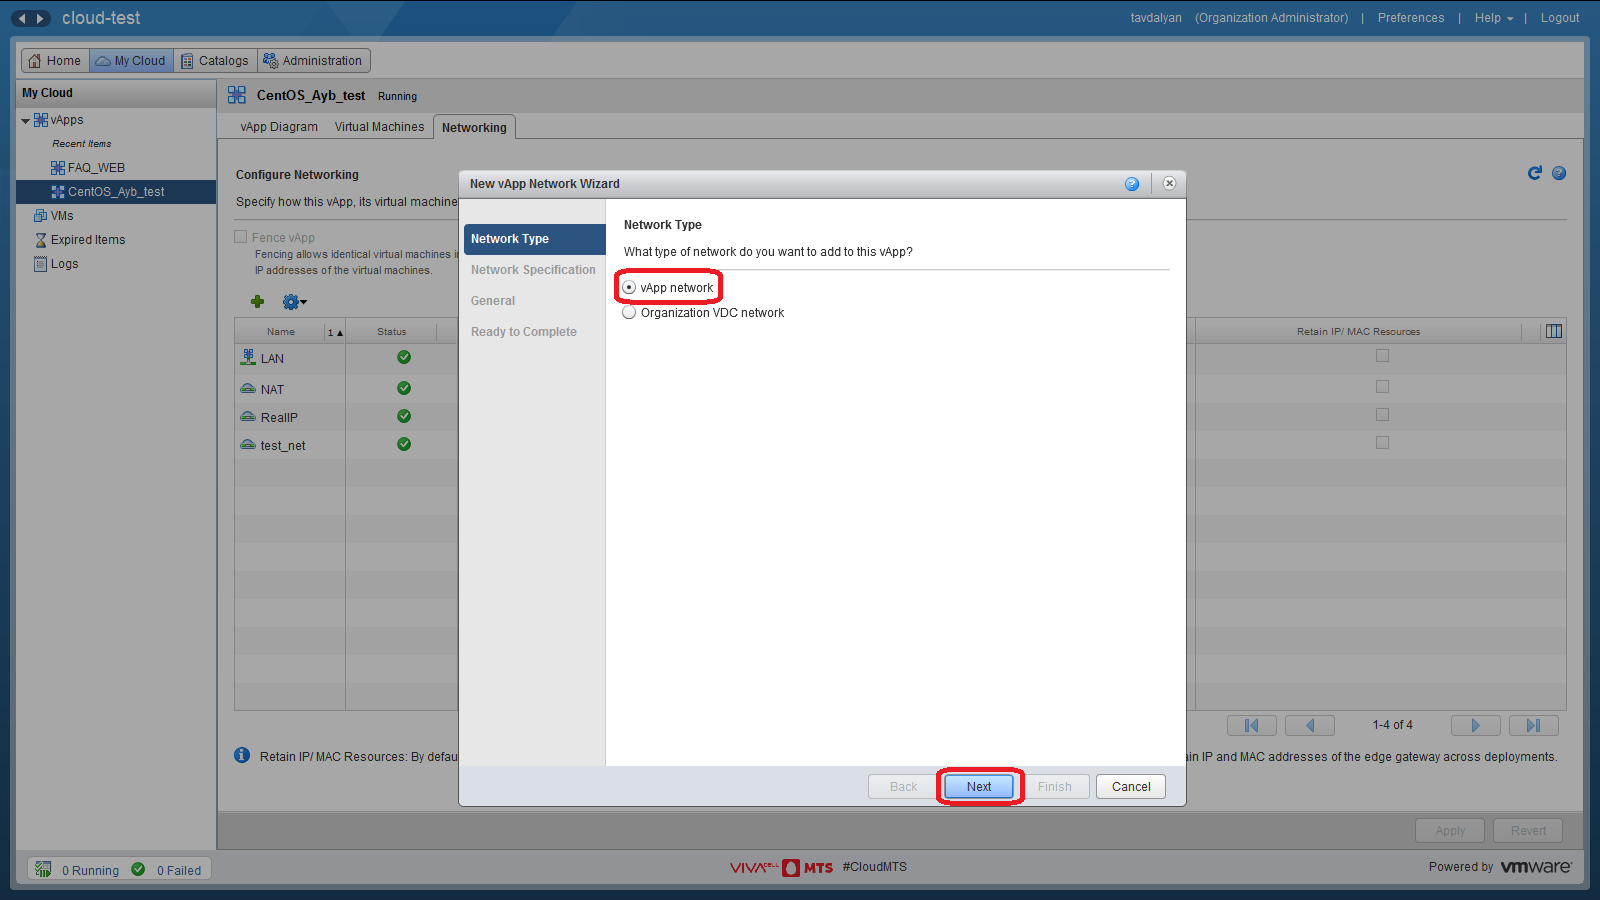
a) Create a virtual vApp network in which the virtual server is located. To do this, select the “My Cloud” section in the top panel, then select “vApps” in the left panel, select the required vApp, select the “Networking” section in the central panel and click the “+” button.
b) In the appeared window, select “vApp Network” in the “Network Type” section, then click the “Next” button.
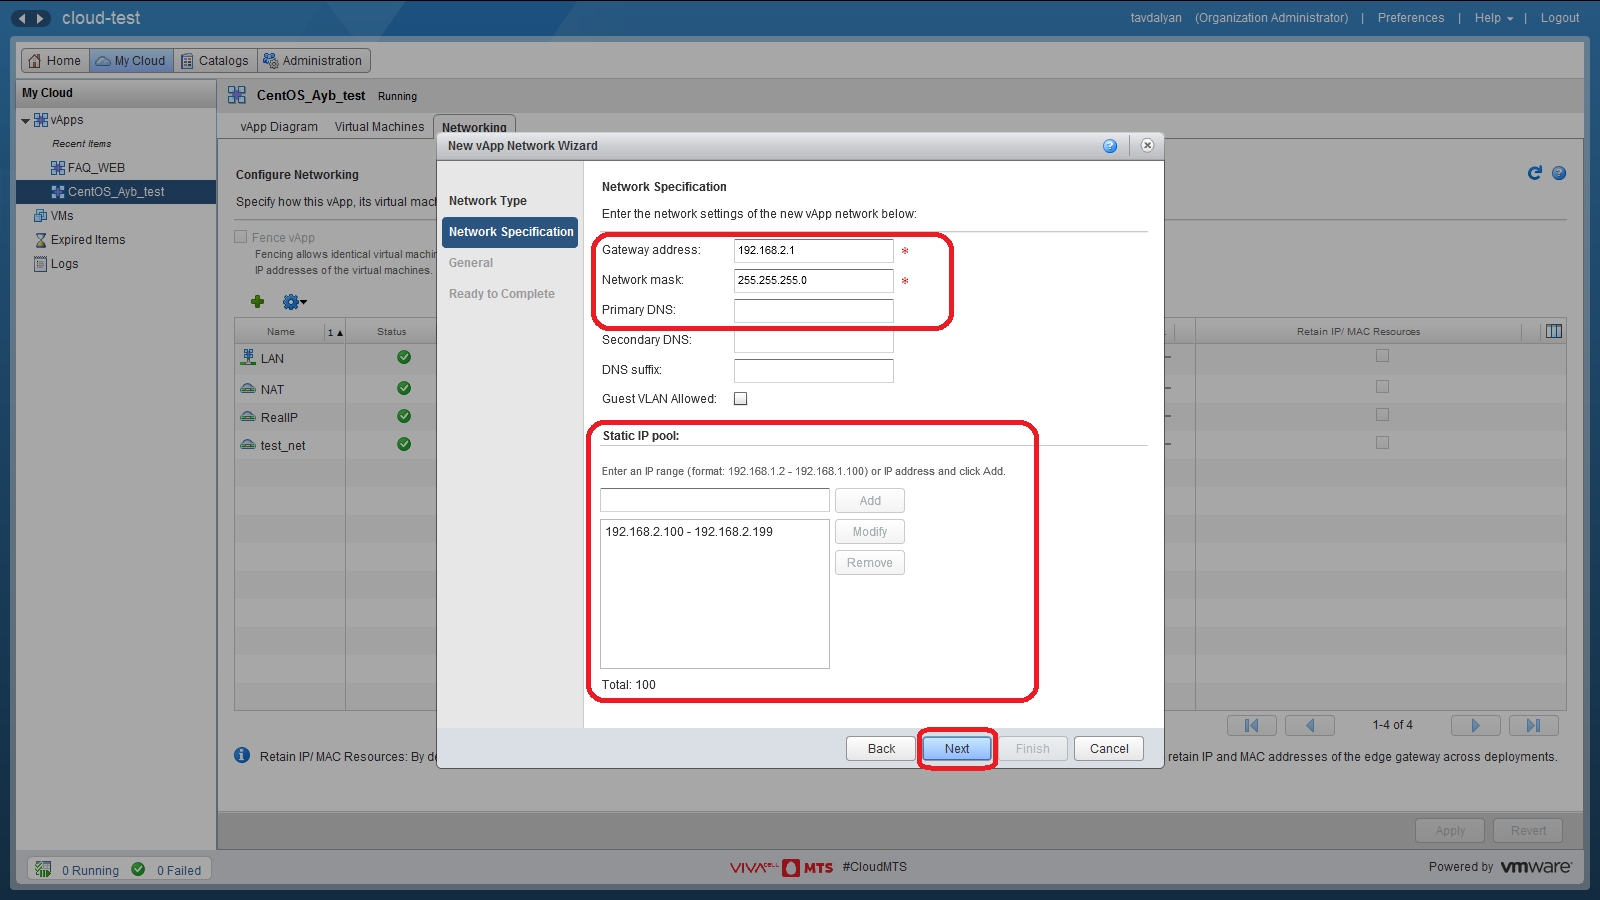
c) In the “Network Specification” section, in the “Gateway address” and “Network mask” items, specify the gateway address and subnetwork mask to which the external IP address allocated for your #VivaCloud organization relates, that must be assigned to the network adapter of the virtual server, if necessary, specify the addresses of the DNS servers in the “Primary DNS” and “Secondary DNS” items, remove the subnetworks from the “Static IP pool” section, if any, and then click the “Next” button.
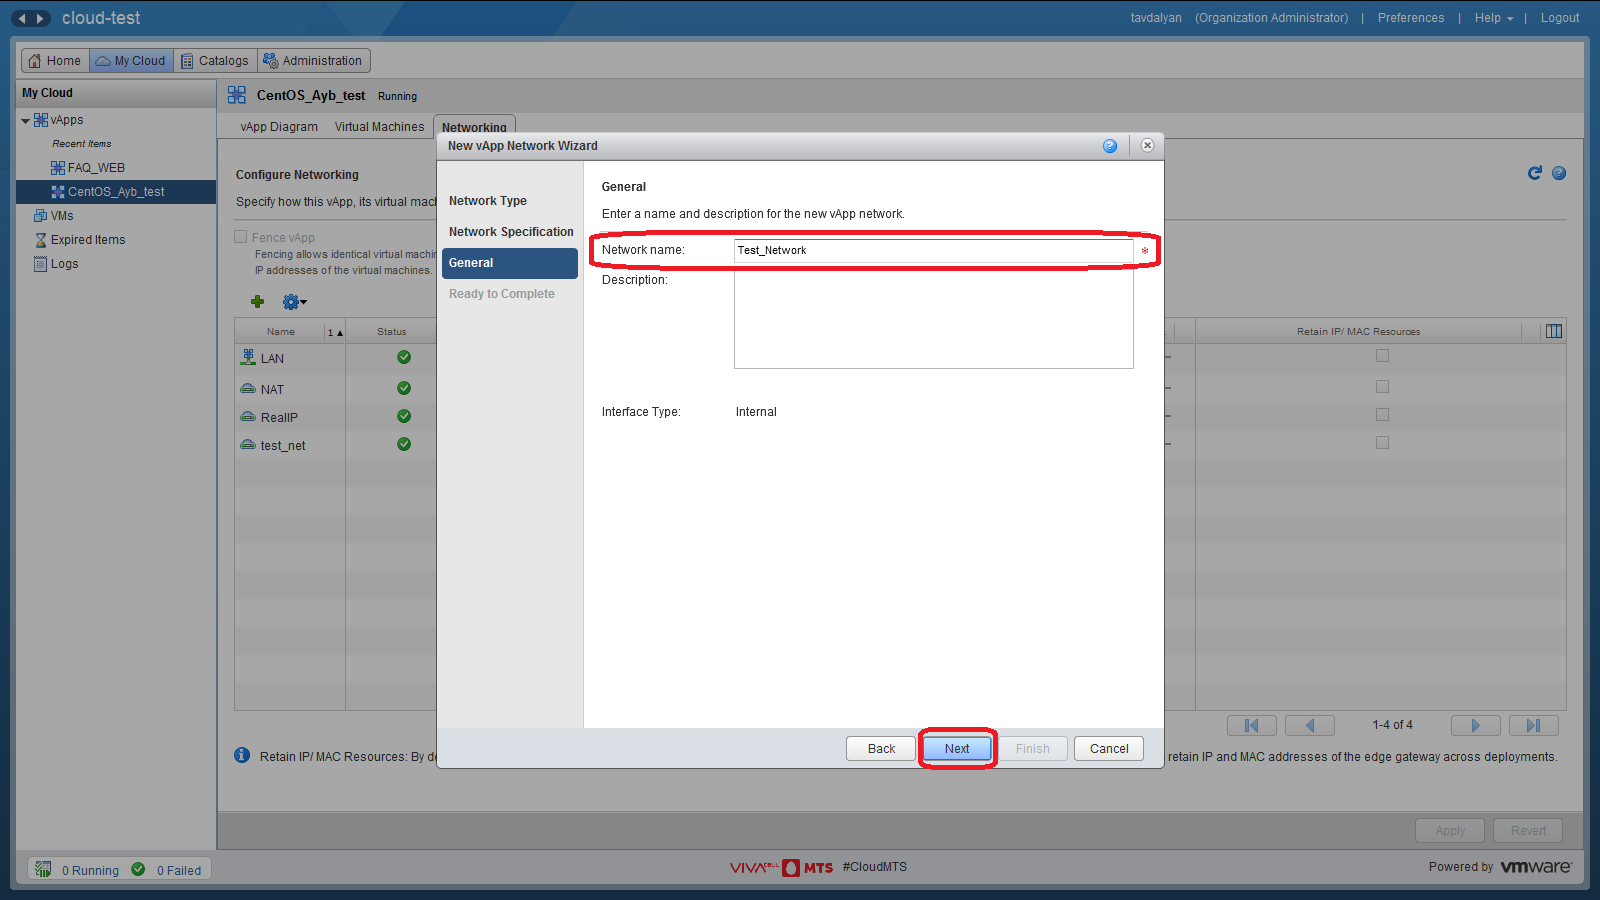
d) In the “Network name” item of the “General” section, enter the name of the vApp virtual network and click the “Next” button.
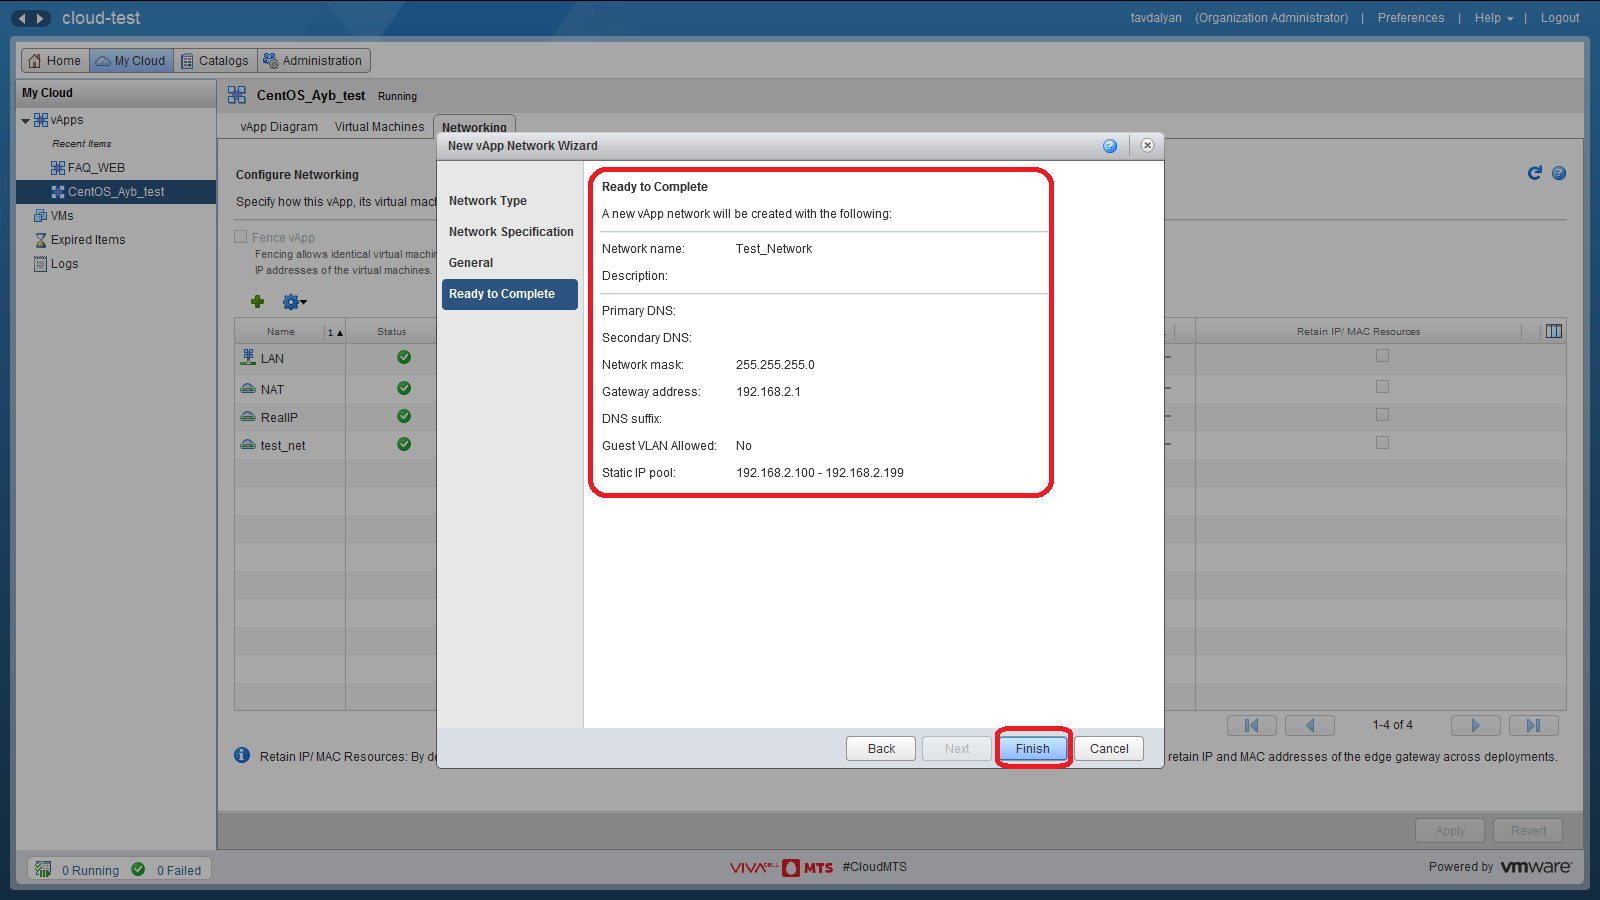
e) In the "Ready to Complete” section, check all the settings and click the "Finish" button.
f) In the "Connection" column, select the virtual network of the organization through which the virtual servers of #VivaCloud organization get access to the Internet by NAT (SNAT rules are configured), in the “Routing” column leave the checkmark of the “NAT” and “Firewall”, and click the “Apply” button.
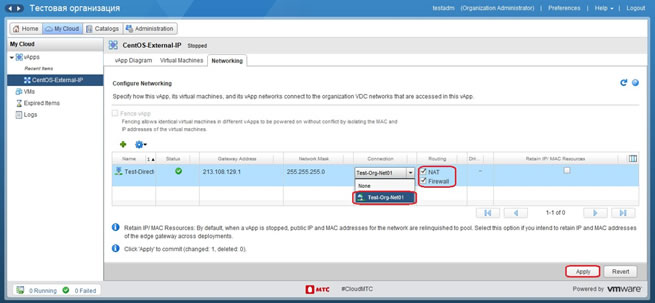
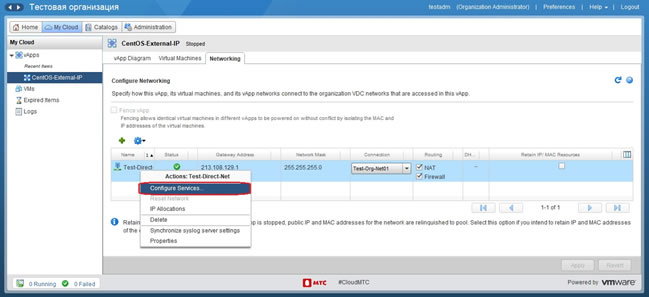
g) Right click on the created network and select the “Configure Services ...” item in the drop-down menu.
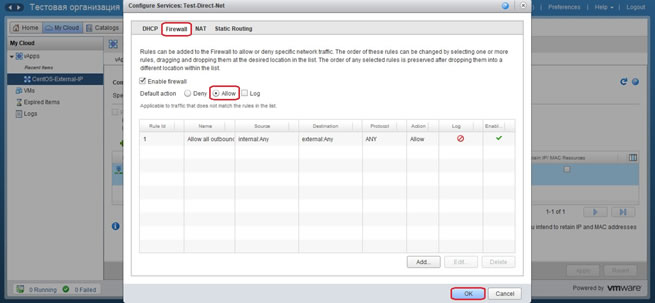
h) In the appeared window, select «Firewall» section, in the «Default action» item, choose "Allow" and click the "OK” button.
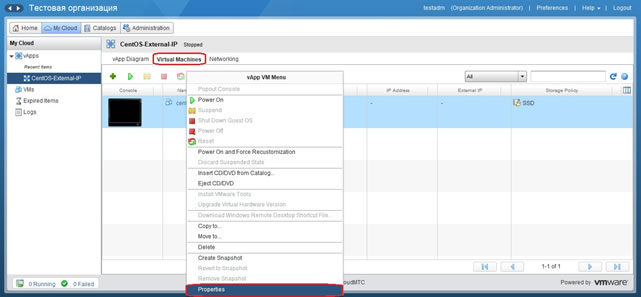
i) Select the “Virtual Machines” section in the central panel, right-click on the virtual server and select the “Properties” item.
j) In the appeared window, select the “Hardware” section, in the “NICs” section for the network adapter in the “Network” column, select the created network, in the “IP Mode” column, select “Static - Manual”, in the “IP Address”column, enter the external IP address and click the "OK” button. After this, “External IP” will be assigned for this adapter.
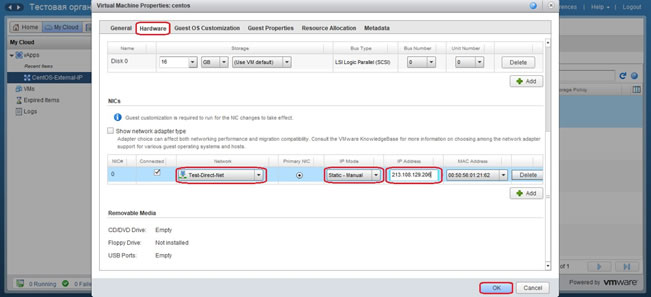
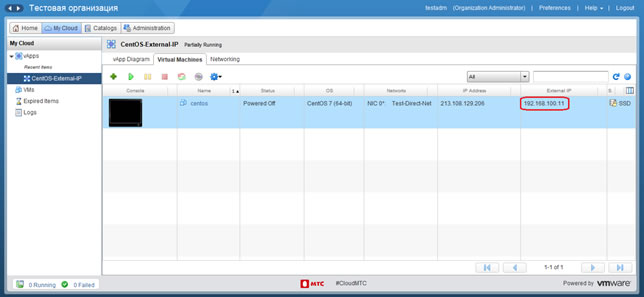
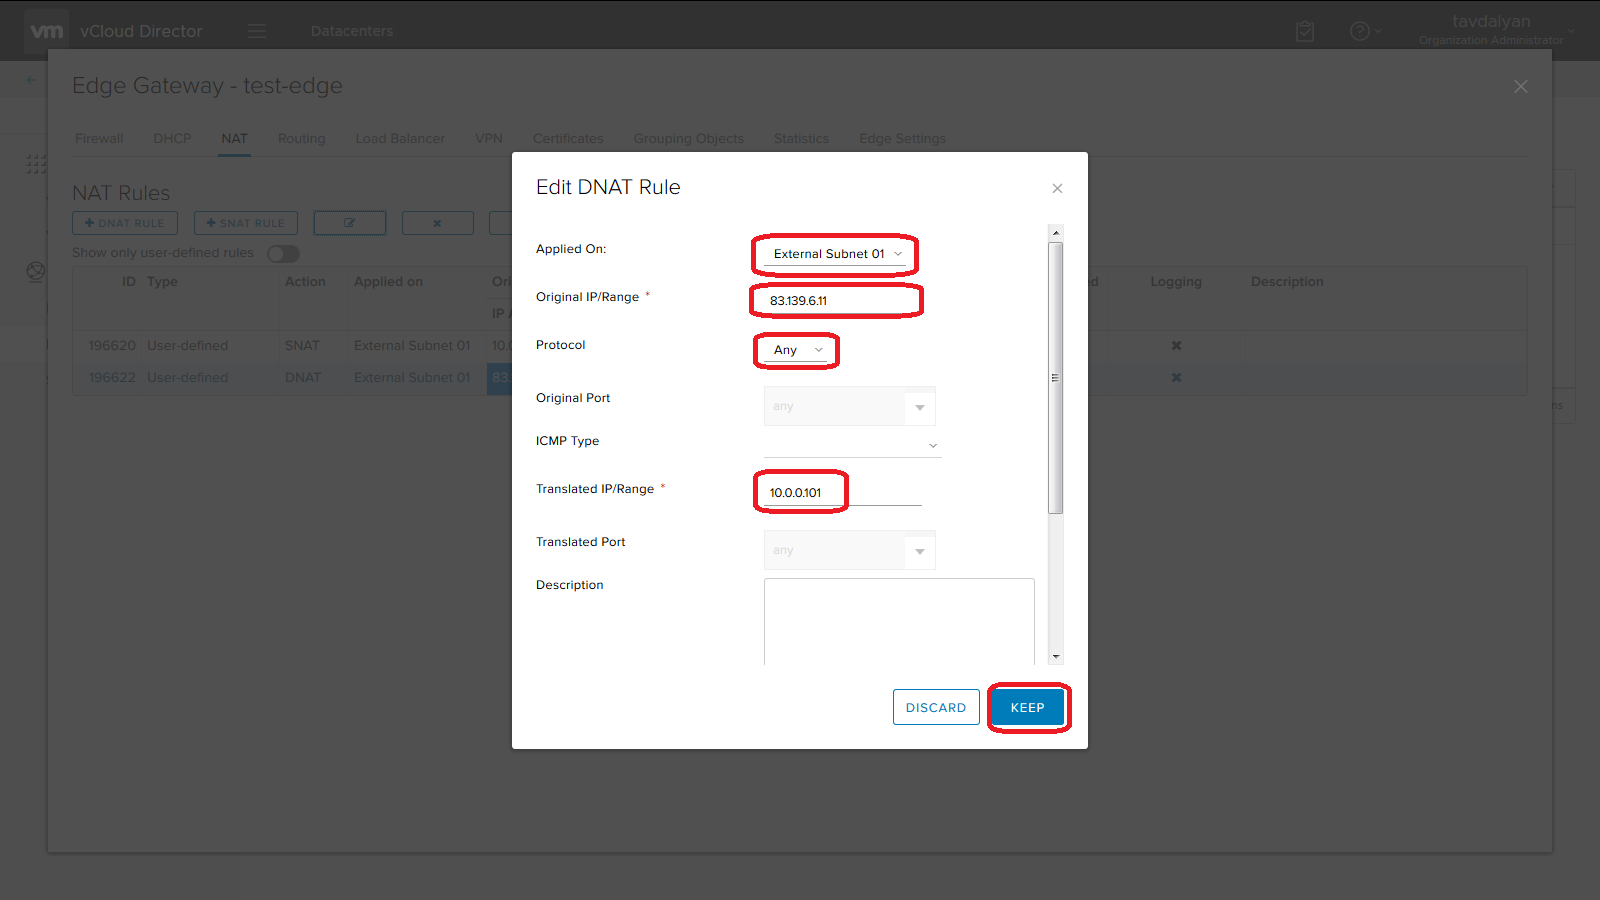
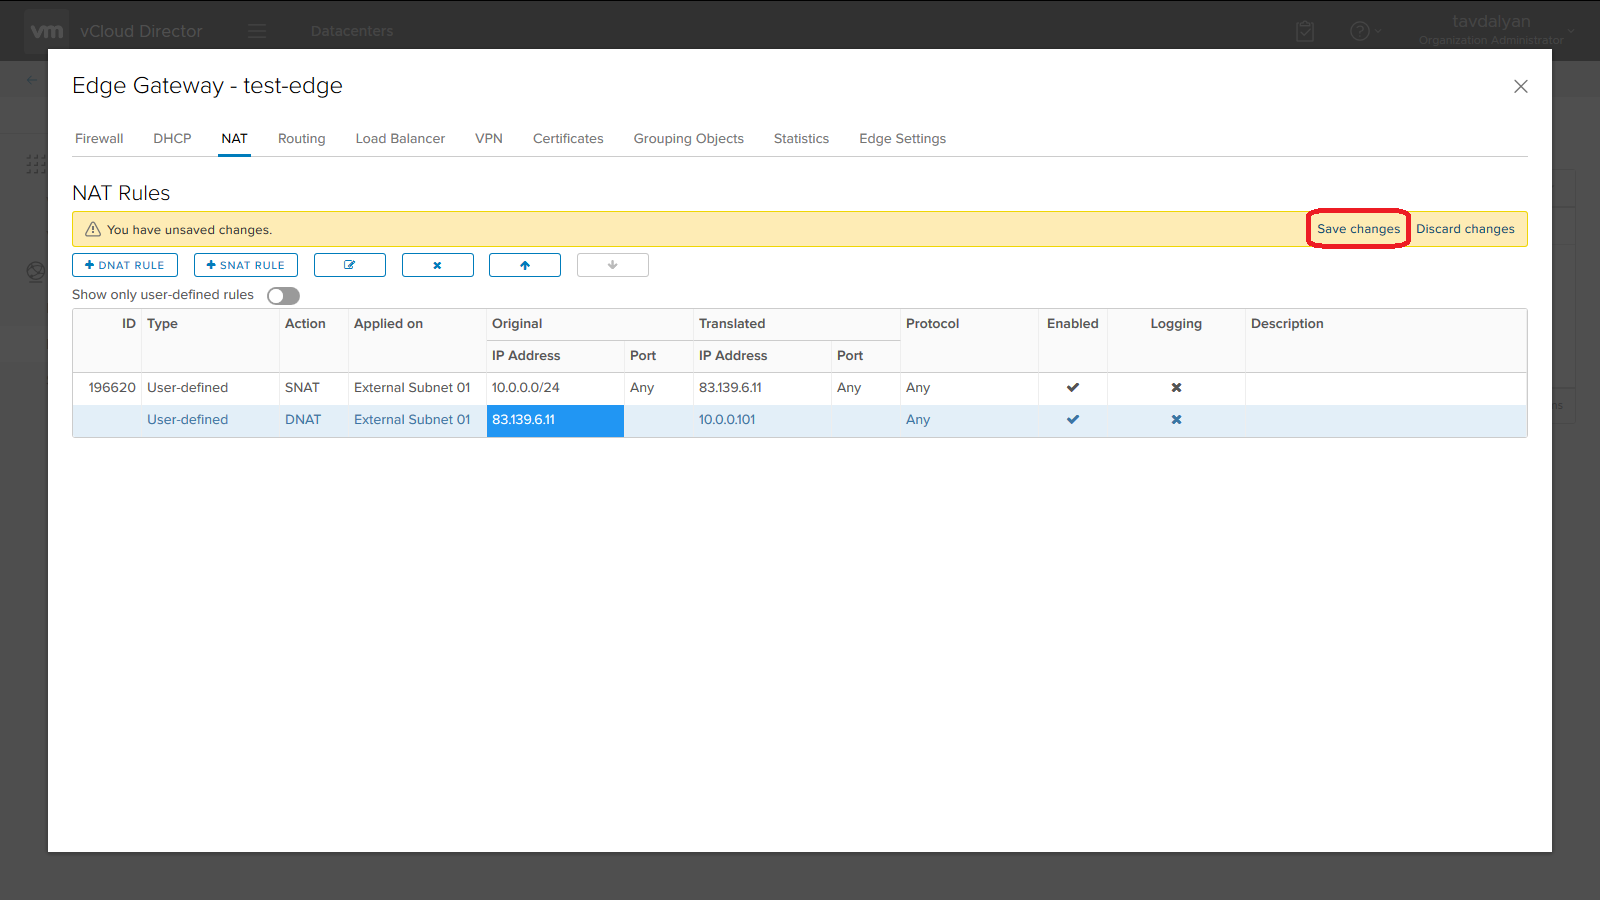
k) Select the “Administration” section in the top panel, then select “Virtual Datacenter” of your #VivaCloud organization (Test-VDC), select the “Edge Gateways” section of the appeared panel set, right-click on the virtual router of your #VivaCloud organization (Test-EdgeGW) and select the “Edge Gateway Services...” section in the drop-down menu. In the appeared window, select the "NAT" section and click the "+ DNAT RULE" button. In the appeared window, select “ClientsExternalNetwork” in the “Applied On” item, enter the external IP address in the “Original IP/Range” item, select “Any” in the “Protocol” item, enter “External IP” from clause “j”of the instruction in the “Translated IP/Range” item, enter the description of the rule in the “Description” item, click the “KEEP” button, then “Save Changes”.
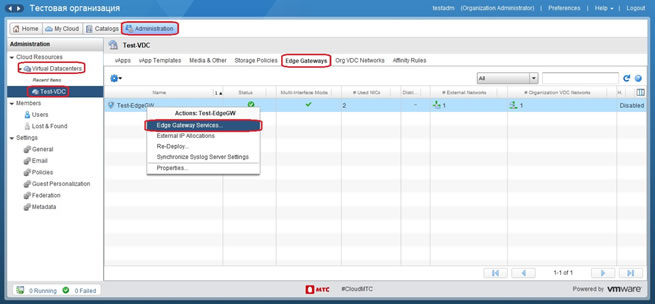
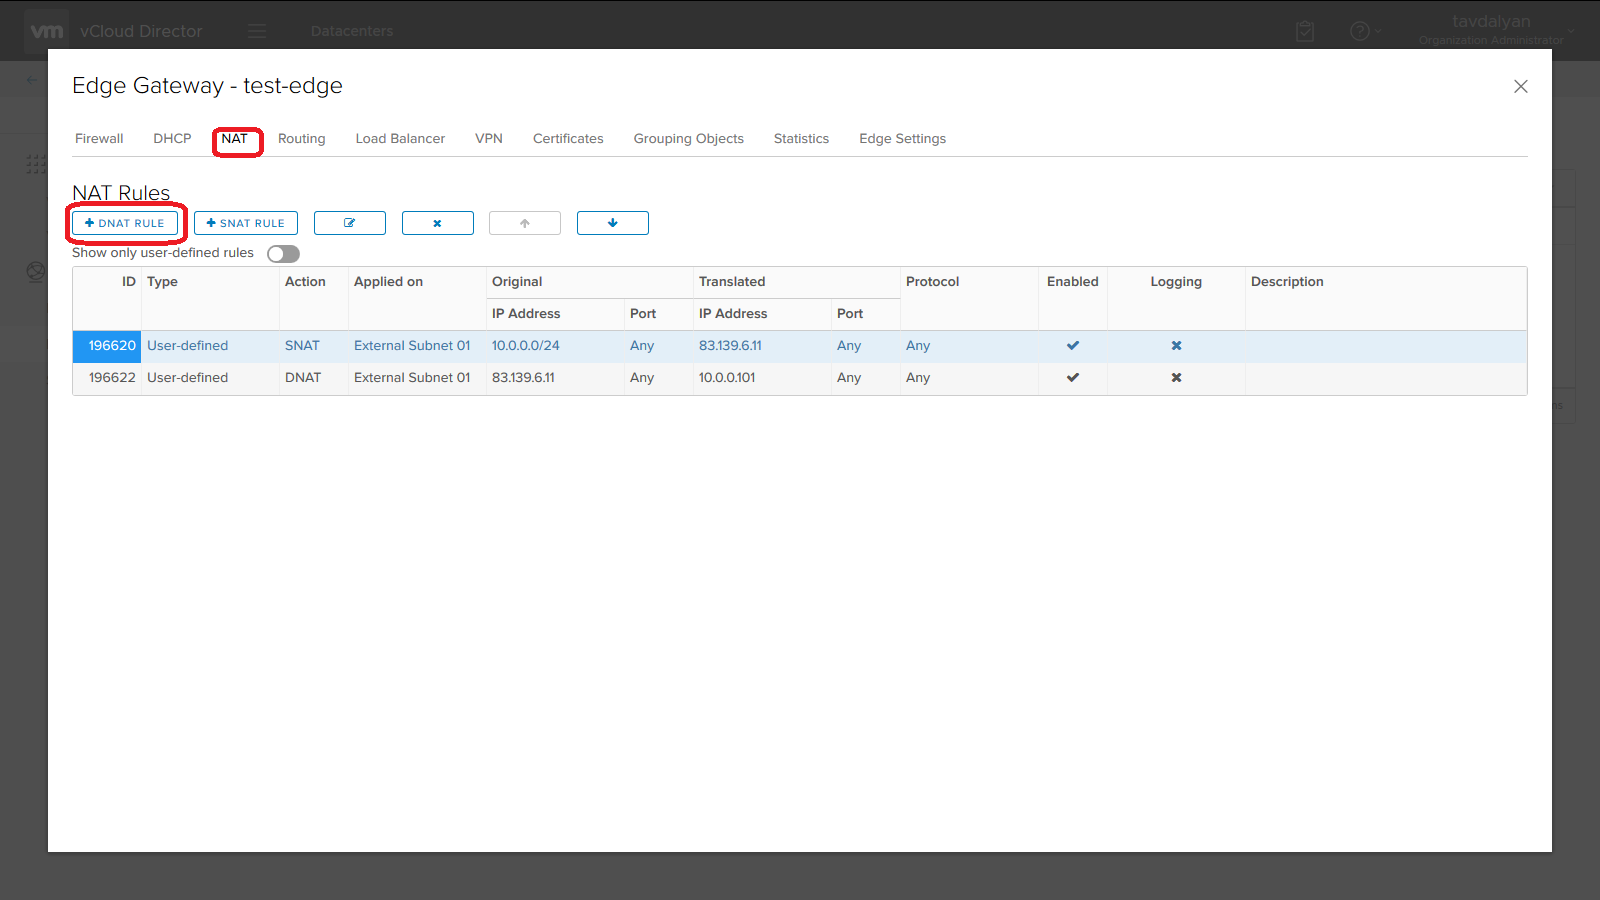
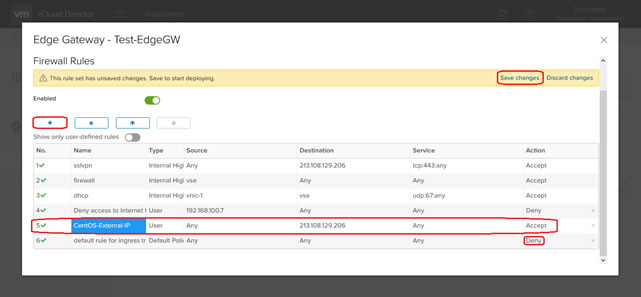
l) In case the “Firewall” of the virtual router of the #VivaCloud organization operates in the “Default action mode:Deny” (“default rule for ingress traffic” with the “Deny” value) select the“ Firewall ”section and create the necessary rules for accessing the virtual server via an external IP address. The screenshot shows the Firewall rule for accessing the virtual server via an external IP address without restrictions.
7. Configuration of IPsec VPN (access to the servers located at #VivaCloud from the local network of the customer)
It is assumed that the appropriate settings have been made on the customer’s local network router. To configure the access to the servers located at #VivaCloud from the local network of the customer, on the virtual router of #VivaCloud organization, it is necessary to: a) Convert the virtual router of #VivaCloud organization into “Advanced Gateway”. To do this, select the “Administration” section in the top panel, then select the “Virtual Datacenter” of your #VivaCloud organization (Test-VDC), select the “Edge Gateways” section in the panel set that is displayed, right-click on the virtual router of your #VivaCloud organization (Test-EdgeGW) and select the “Convert to Advanced Gateway” item in the drop-down menu. Select "Yes” in the appeared window.
b) Right click on the virtual router icon of your organization and select the “Edge Gateway Services ...” item.
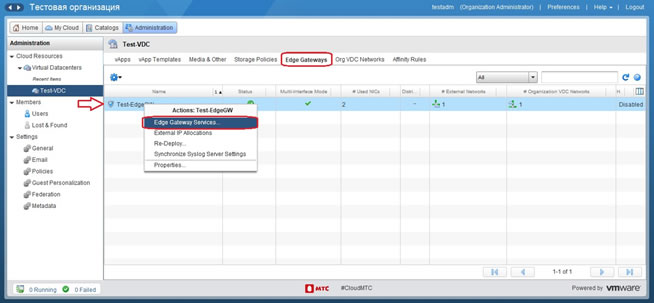
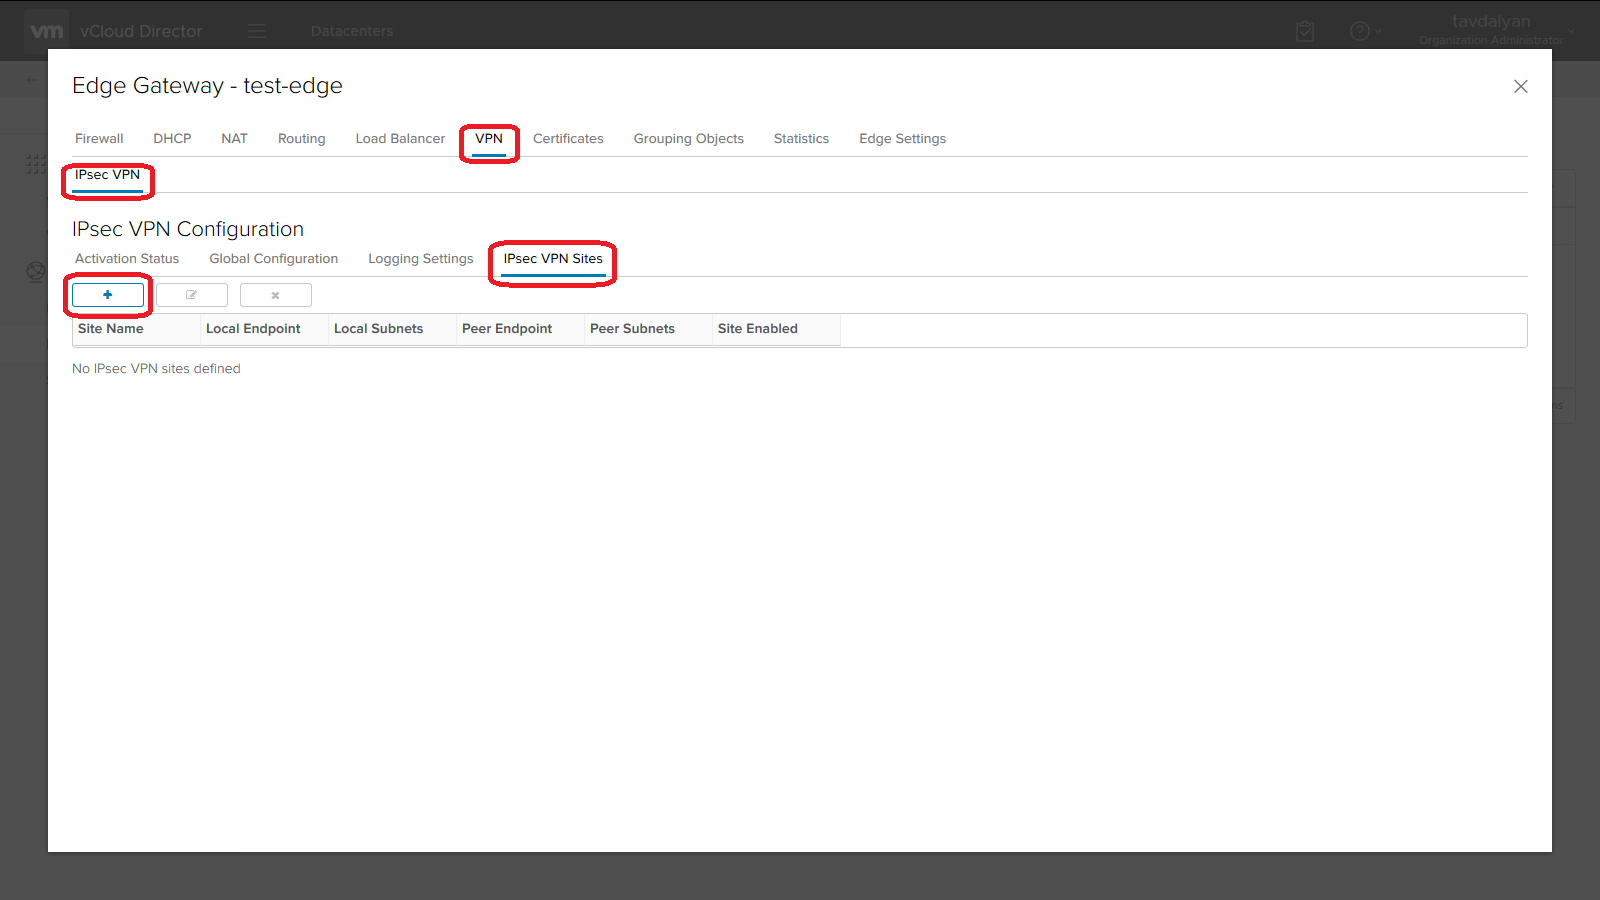
c) Select the “VPN” section in the appeared window, then select the “IPsec VPN” subsection, then select “IPsec VPN Sites” subsection and click the “+” button.
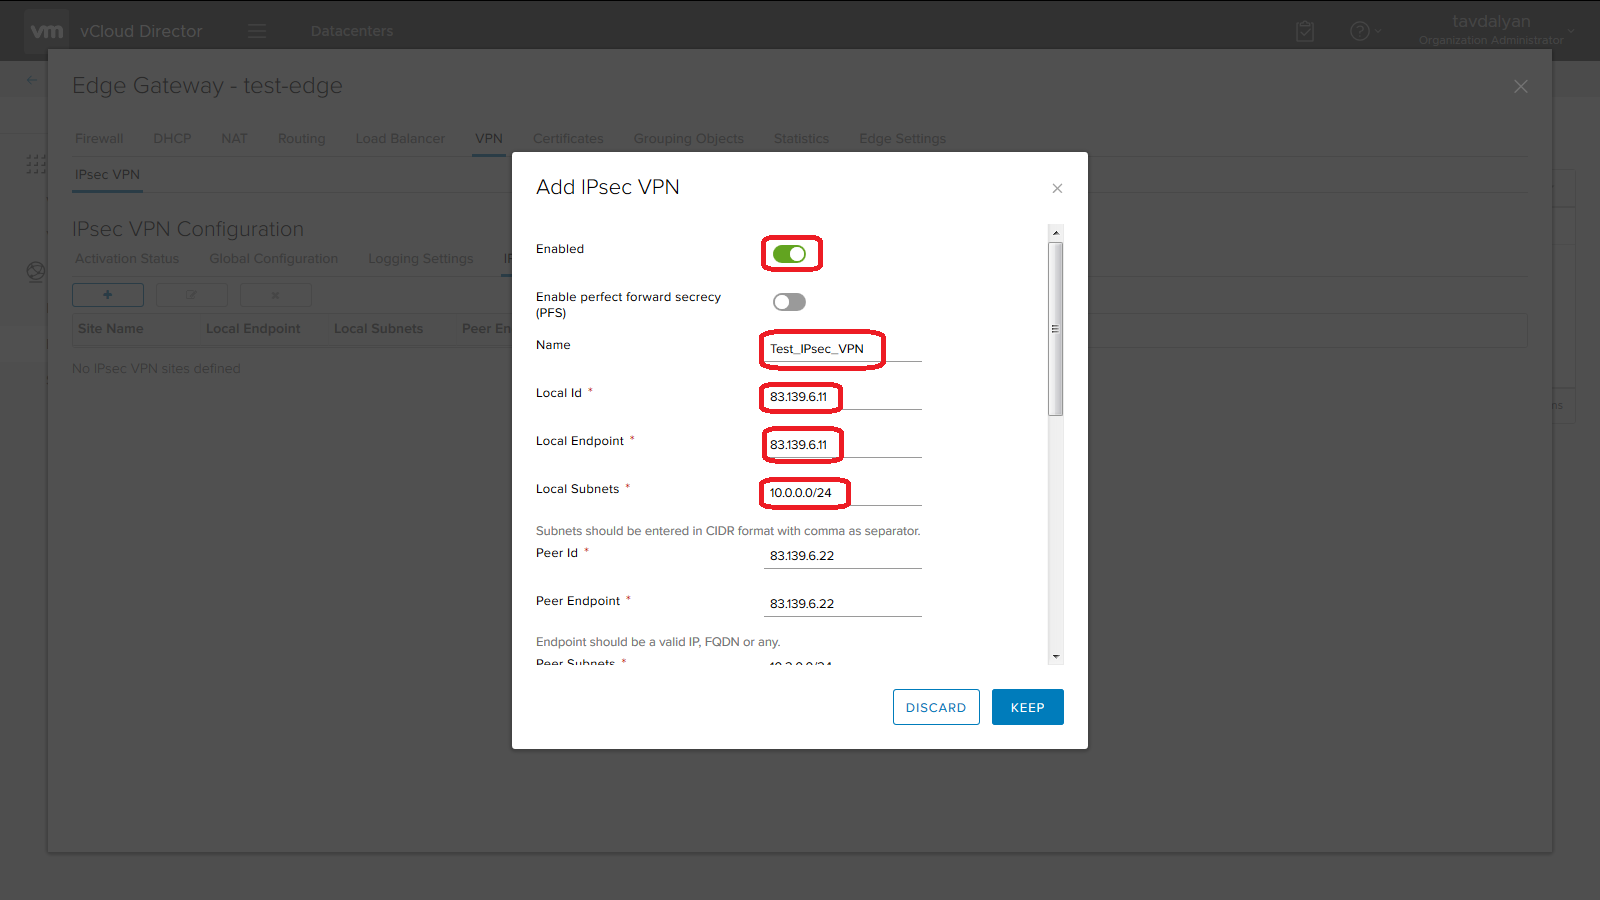
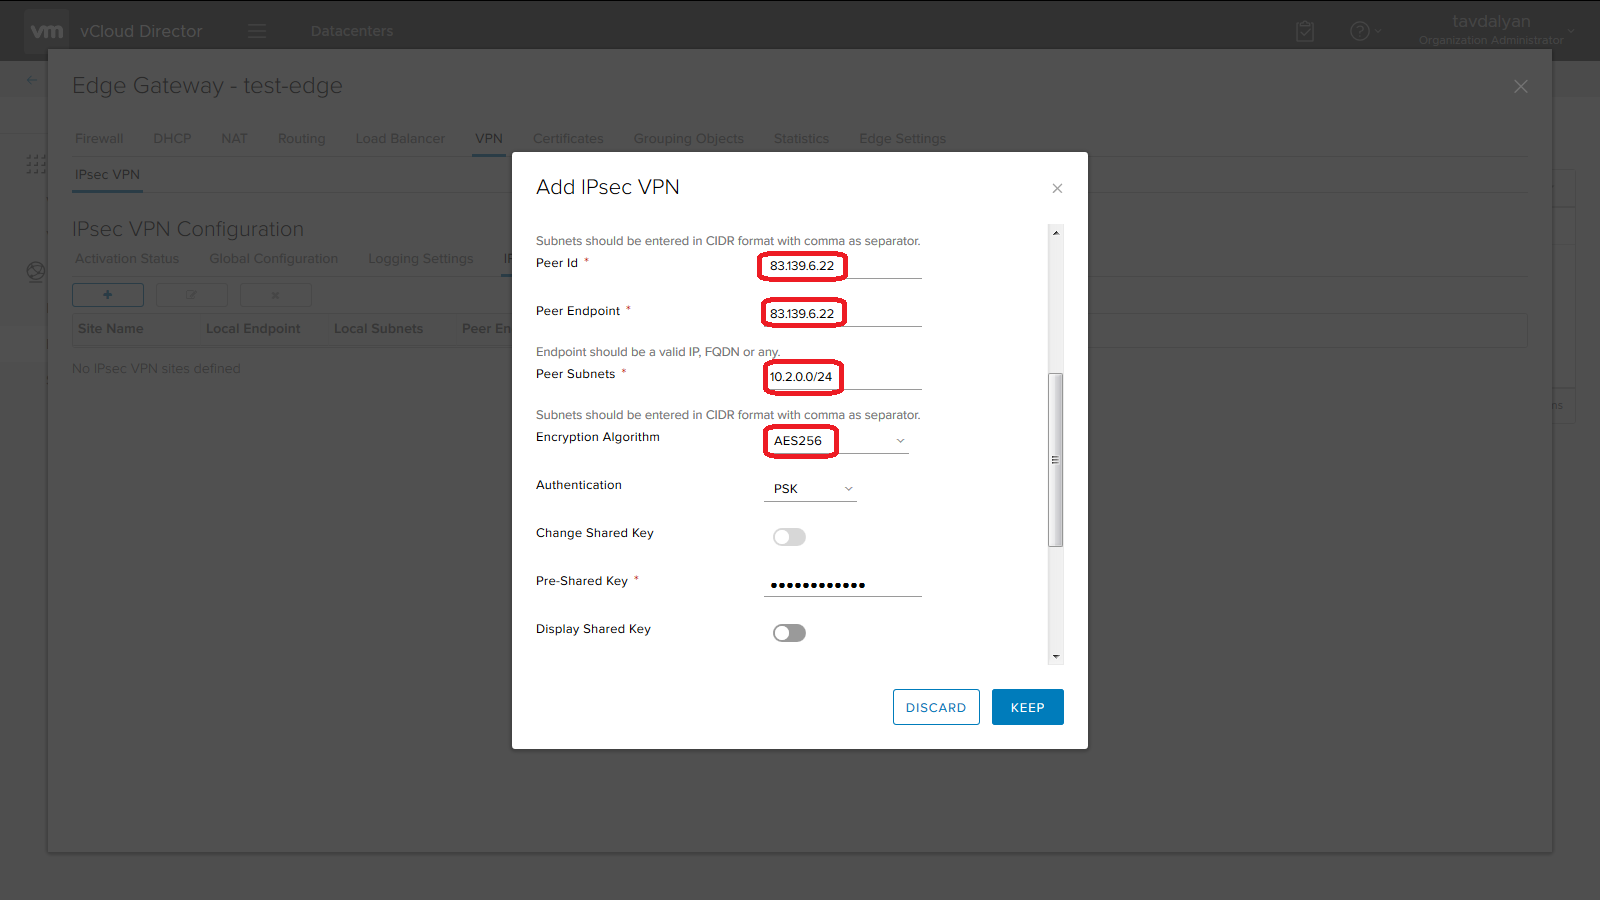
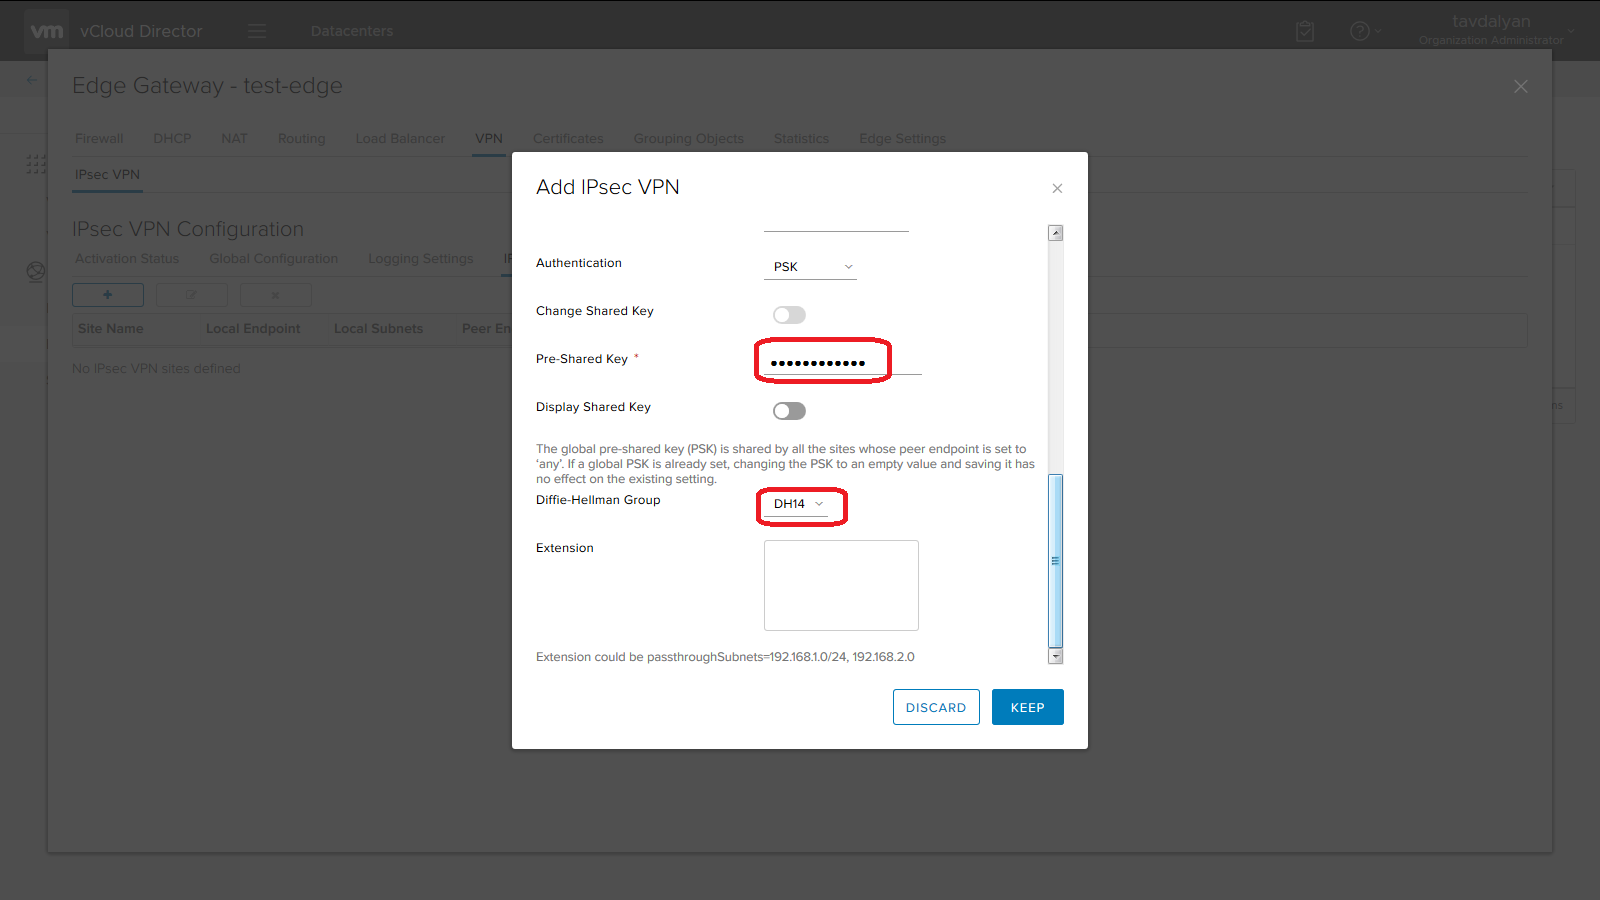
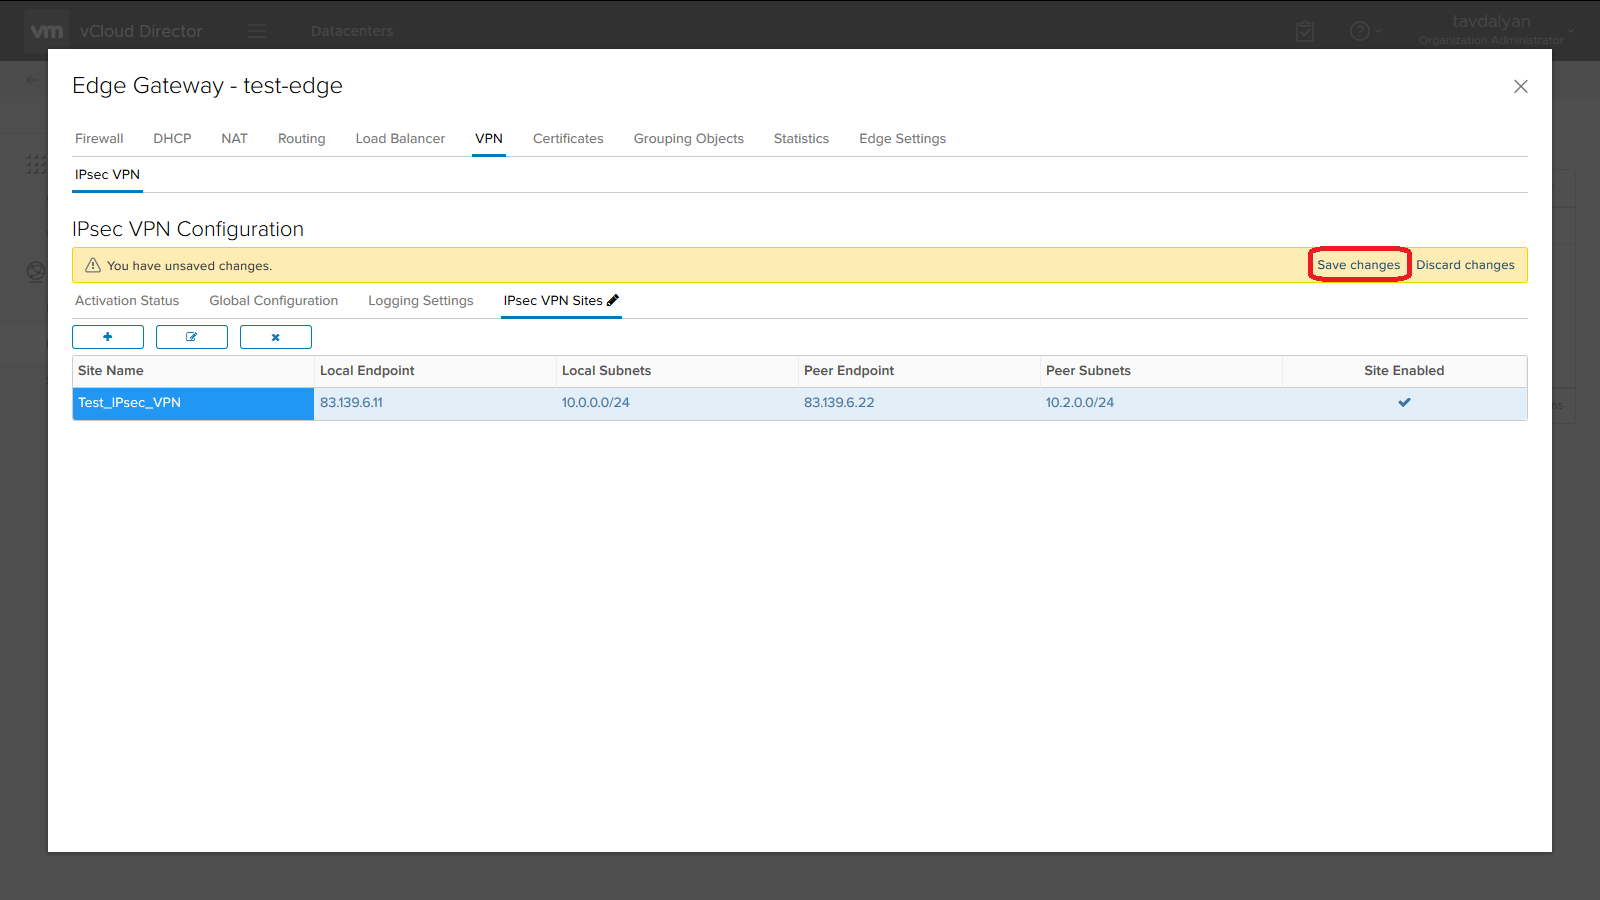
d) In the appeared window, select the “Enabled” option, in the “Name” item, enter the name of the IPsec VPN connection, in the “Local Id” and “Local Endpoint” items, enter the external IP address from the list allocated to #VivaCloud organization, in the “Local Subnets” item, enter the list of #VivaCloud organization networks, the access to which is required from the customer’s local network, in the “Peer Id” and “Peer Endpoint” items, enter the external IP address of the customer’s local network router, in the “Peer Subnets” item, enter the list of subnetworks of the customer’s local network, the access to which is required from #VivaCloud organization networks, in the “Encryption Algorithm” item, it is recommended to select “AES256”, in the “Pre-Shared Key” item, enter a key similar to that specified in IPsec VPN connection settings on the customer’s local network router, in the “Diffie-Hellman Group” item, it is recommended to select “DH14” (or a group with a lower index number), click the “KEEP” button and then “Save Changes” to apply the settings.
e) Select the “Activation Status” subsection, enable the “IPsec VPN Service Status” option and click the “Save Changes” button to apply the settings.
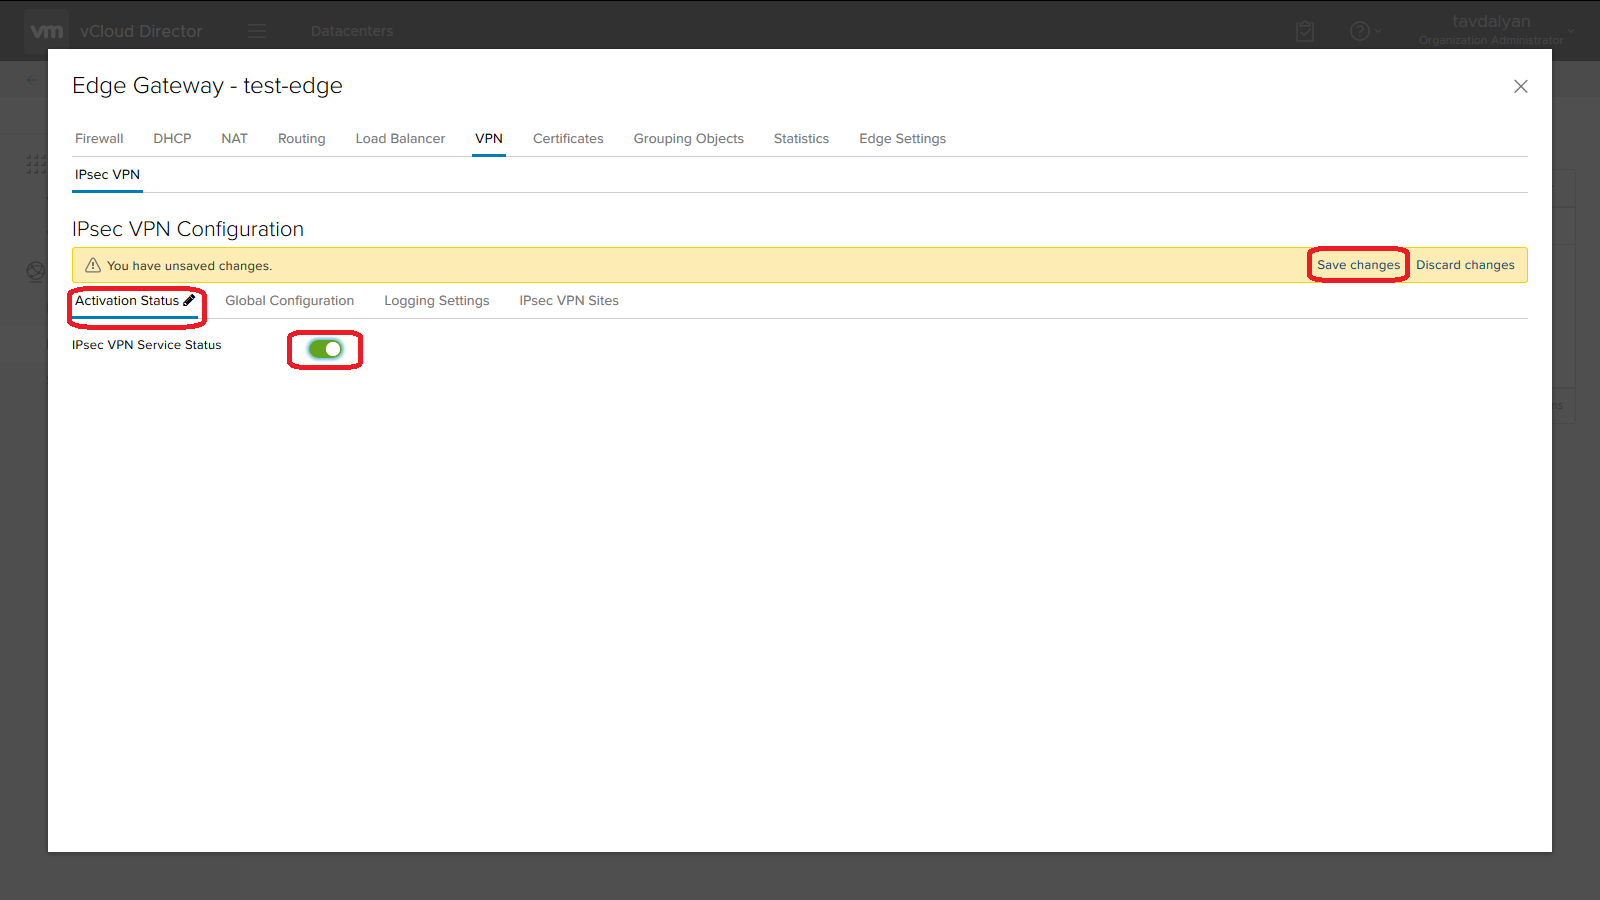
Note: All “Firewall” and “NAT” rules necessary for IPsec VPN on the virtual router of #VivaCloud organization are added automatically when the service is turned on. The following ports\protocols should be opened on the local network router of the customer’s organization: 500\UDP, ESP (50\IP), in case of NAT – 4500\UDP.
You can also reach us at 111 or 093 297111.
For information about fixed services please call at 060 61 00 00 phone number.
